How to get a virtual phone number to receive SMS online

There are quite a few free websites out there that provide virtual phone numbers to receive SMS online but they do not usually work. 

There are two main reasons for it –

  1. The phone number was previously used by other users as most of the websites have a limit on how many times a phone number can be used. Some sites allow a number to be used only once while others like Gmail do give the freedom to use the number multiple times but still there is a limit beyond which the number cannot be used. Since the free numbers are public therefore as soon as they are released they get tried by many users which makes them unusable within a few hours of release. 
  2. The phone number may be unsupported as many websites especially the top tier sites and apps like google, twitter, facebook, telegram etc.. do not allow virtual / VOIP phone numbers to be used for verification purposes. There are tools and APIs using which once can easily determine if the phone number is virtual / VOIP or it belongs to carriers such as Vodafone, T-mobile, etc.. This also answers the question as to how the websites know if the phone number is VOIP or sim-based.

If you are lucky enough to get your hands on the public phone number as soon as it is released and it works for you even then privacy may be a factor worth considering. In case of public phone number it possible for someone to access your account by using the same phone number since everyone has access to it and anyone can request and read the SMS received on the free public phone number.

Now if you want to receive an SMS text message online without a phone but want the number to be private then there is a service that you can make use of.

FelixMerchant is a service that provides private phone numbers that are sim-based meaning that they belong to mobile carriers like vodafone, t-mobile which are supported by all the websites out there so you don’t have to worry about the number not being unsupported.

The service comes with free support. The live chat agent is always there to help you if you face any problem.

How to bypass twitter phone verification

If you are looking to bypass twitter phone verification without a phone number then I must say it is not possible but there is a simple workaround.

You can just get a sim-based phone number to verify your twitter account online.

So where to get such a phone number?
FelixMerchant is a provider of real phone numbers that belong to mobile carriers and is guaranteed to work with not only twitter but many other websites out there.

There are two types of phone numbers offered by felixmerchant –
One time use only (disposable number) and Permanent number which can last from a week to a month and it can be renewed, so the duration isn’t a problem if you want it for more than a month.

The question is which is the best for you, which one should you buy?
The disposable number is a quick and cheap solution while a permanent number can be a bit costly but comes with peace of mind. Twitter is known to be strict with phone verification.

Since the disposable number can only be used once for unlocking the Twitter account or creating a new one with the activation code, it should not be kept in the twitter account. After using it you should remove the phone number from your twitter account which can easily be done from the settings. This is because you never know when twitter will ask you for re-verification and if it does then you will be locked out of your account with no way of getting back in because you won’t have access to the disposable phone number.
On the other hand, you can safely keep the permanent number in your twitter account and whenever twitter locks you out or asks you to re-verify you can easily access the verification code sent to the permanent number.

When you remove the phone number from twitter, it could ask you to verify your phone number after an hour, after a week or a month if you are lucky but you can’t predict it. So if you buy a disposable number then you are kind of hoping that twitter doesn’t ask you for phone verification again. I do not have access to twitter code base I do not know how this all works, how verification is triggered, what algorithms they use but personally I think twitter doesn’t like if you add and remove the phone number quickly.
I believe that buying a permanent phone number for a week and then removing it after your subscription ends is better than removing it instantly after the verification.

So both types of numbers will give you access to your account, it’s up to you which one you want. It is safe to use a disposable number in the twitter account as long as you remove it after getting access to your account.

CentOs VPS Setup To Host Your Website – Step By Step Guide

How to get started and host your website on CentOs VPS

This series of tutorials will guide you on how to setup your website on a RHEL / Centos 7 linux server. From apache installation to basic firewall setup to SSL certificate to wordpress installation everything is covered.

List Of Setps

  1. Starting up: The first step
  2. Apache HTTP server Installation
  3. MySQL Database Installation
  4. PHP Installation
  5. Virtual Host configuration
  6. Installing WordPress
  7. Setting up cloudflare SSL
  8. Changing the SSH port
  9. iptables basic firewall setup
  10. Installing and configuring fail2ban intrusion prevention software
  11. Disabling root login
  12. Disabling direct IP access

Woocommerce Plugins to Change Currency Based On User’s Location

If your woocommerce store serves users from multiple countries there is often a need to automatically switch currency based on user’s IP address / location.

An advantage of auto switching currency based on location is that in some countries people can’t make payments using the default USD or other international currencies except their local currency unless they have an international debit card.
Another advantage is from a subjective point of view that people are used to seeing their local currency, it makes them feel at home, so he/she may be more willing to go ahead and buy a product in his/her local currency.

List of Woocommerce currency switcher based on IP (Location)

Along with automatic currency switching all these plugins also come equipped with manual currency switcher widget which gives users the ability to change currency manually from the list.

WooCommerce Price Based on Country
In its free version you can add as many countries as you want but the exchange rate has to be entered manually and it doesn’t auto update. If you have many countries to manage then it would become quite painful to update exchange rates manually.
Pro version is subscription based costs around 39 USD/year for 1 website
https://www.pricebasedcountry.com/pricing

Currency Switcher for WooCommerce
In the free version maximum currencies you can add – 2
Currencies Update automatically based on exchange rate – Yes
Pro version starts from 19 USD a year for single site license and can go upto 90 USD for lifetime license which allows unlimited number of sites.
https://wpfactory.com/item/currency-switcher-woocommerce-wordpress-plugin

WooCommerce Currency Switcher by realmag777
In the free version maximum currencies you can add – 2
Currencies Update automatically based on exchange rate – Yes
Its pro version is not subscription based and costs around 31 USD for lifetime.
https://codecanyon.net/item/woocommerce-currency-switcher/8085217

WooCommerce Multi Currency
In the free version maximum currencies you can add – 2
Currencies do not update automatically in the free version.
This plugin is also not subscription based and costs around 30 USD.
https://codecanyon.net/item/woocommerce-multi-currency/20948446

How to disable direct ip access on CentOs VPS

Disabling direct IP access prevents  anyone from accessing your website using the IP address.
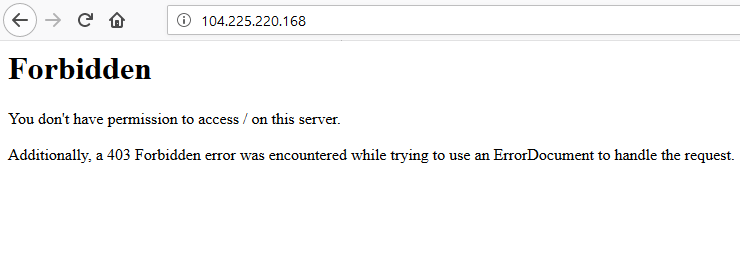
If anyone tries to access your site using the IP address then a 403 Forbidden error will be shown.

To disable direct IP access you would have to edit the virtual host file

sudo vi /etc/httpd/conf.d/example.com.conf

Modify the above command based on your domain name and location of virtual host file.
conf.d directory is the default location of the virtual host file which I used in one of my earlier tutorials about virtual host.

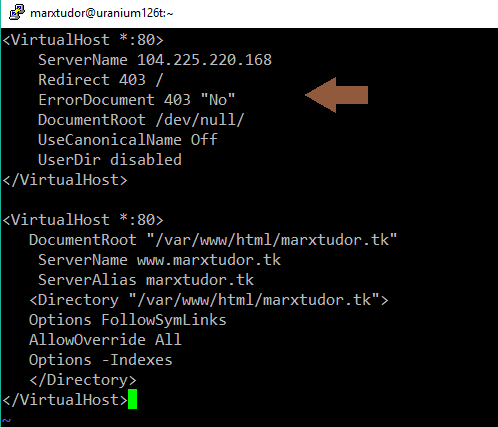
Paste the code given below in your virtual host file. Replace 104.225.220.168 with your server’s IP address

<VirtualHost *:80>
    ServerName 104.225.220.168
    Redirect 403 /
    ErrorDocument 403 "No"
    DocumentRoot /dev/null/
    UseCanonicalName Off
    UserDir disabled
</VirtualHost>

disable direct ip access centos

After editing the virtual host file restart the server

sudo systemctl restart httpd

Now accessing the site via IP address would lead to 403 forbidden message being displayed
forbid direct ip access in vps

How to disable root login on CentOs VPS

Root login should ideally be disabled due to security reasons.

To disable root login edit the sshd_config file using vi or any other editor

 sudo vi /etc/ssh/sshd_config

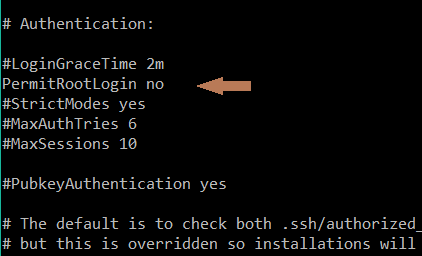
The above command would open up the sshd_config file

disable root login in centos
Change the line
#PermitRootLogin yes to PermitRootLogin no

After making the change restart sshd

sudo systemctl restart sshd

Installing and configuring fail2ban on CentOs 7

Fail2Ban is an intrusion prevention software framework that can protect your VPS by banning IPs that show malicious signs such as too many login failures.

To install Fail2Ban first install epel-release

sudo yum install epel-release

Now install Fail2Ban

sudo yum install fail2ban

Enable

sudo systemctl enable fail2ban

The default fail2ban configuration file is /etc/fail2ban/jail.conf.
It is not recommended to modify the original /etc/fail2ban/jail.conf directly.
Instead, we should configure the local copy called jail.local which will override the jail.conf file.

sudo cp /etc/fail2ban/jail.conf /etc/fail2ban/jail.local

Now open jail.local file in vi or any other editor

sudo vi /etc/fail2ban/jail.local

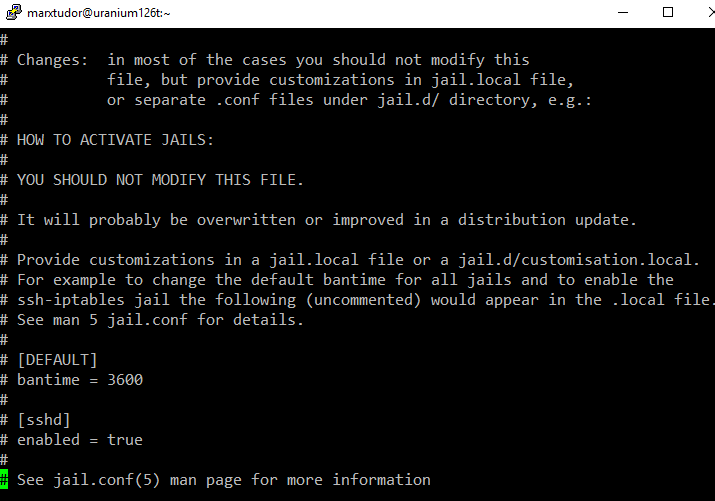
This is what the default fail2ban files looks like
fail2ban centos

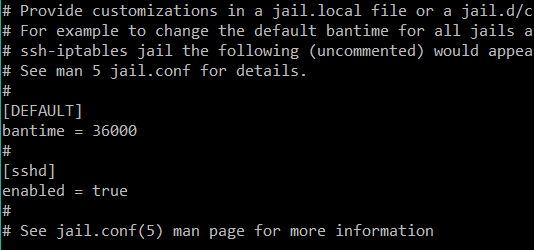
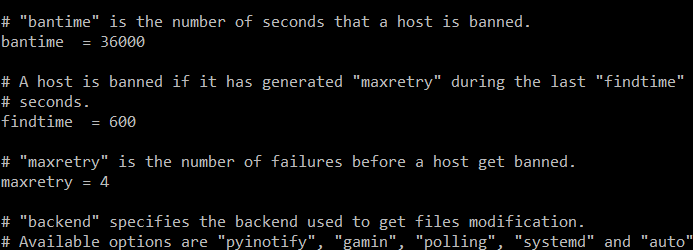
I changed the default ban time to 36000 which is equal to 10 hours.
Monitoring ssh (sshd) logins has also been enabled.

fail2ban setup

bantime = 36000 = 10 hours
maxretry changed to 4 which is the number of failed attempts before a host is banned
findtime = 600 = 10 minutes : 4 unsuccessful login attempts within 10 minute window would lead to ban.

fail2ban failed login configure

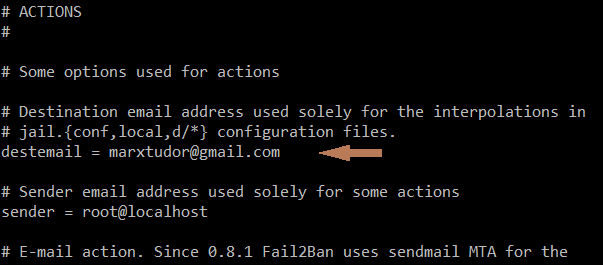
destmail = email where you want to receive ban messages and notifications.

fail2ban email setting

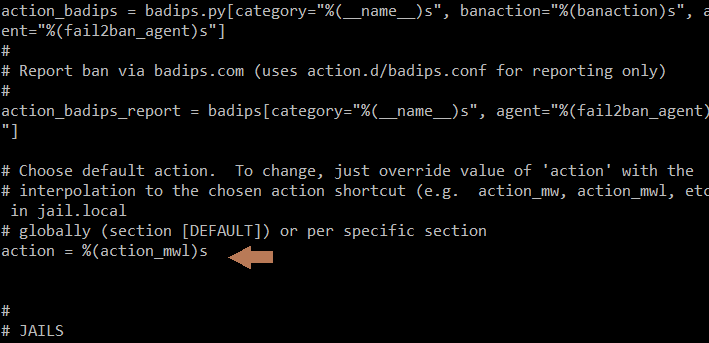
Change (action_)s to (action_mwl)s if you want to receive email alerts and logs. If you want only email alerts and no logs then (action_mw)s

fail2ban email alerts

After you are done save and quit the file and then restart Fail2ban

sudo service fail2ban restart

Or

sudo systemctl restart fail2ban 

Installing and configuring iptables firewall on CentOs 7

First install iptables with this command

sudo yum install iptables-services

Now start iptables

sudo service iptables start

Use the below command to flush any existing rules that might be there

sudo iptables -F

Now add rules one by one by executing the following commands

Block null packets

sudo iptables -A INPUT -p tcp --tcp-flags ALL NONE -j DROP

Reject is a syn-flood attack

sudo iptables -A INPUT -p tcp ! --syn -m state --state NEW -j DROP

XMAS packets

sudo iptables -A INPUT -p tcp --tcp-flags ALL ALL -j DROP

Allow localhost traffic

sudo iptables -A INPUT -i lo -j ACCEPT

Allow http port 80

sudo iptables -A INPUT -p tcp -m tcp --dport 80 -j ACCEPT

Allow https port 443

sudo iptables -A INPUT -p tcp -m tcp --dport 443 -j ACCEPT

Allow SMTP

sudo iptables -A INPUT -p tcp -m tcp --dport 25 -j ACCEPT
sudo iptables -A INPUT -p tcp -m tcp --dport 465 -j ACCEPT

Allow POP3

sudo iptables -A INPUT -p tcp -m tcp --dport 110 -j ACCEPT
sudo iptables -A INPUT -p tcp -m tcp --dport 995 -j ACCEPT

Allow IMAP

sudo iptables -A INPUT -p tcp -m tcp --dport 143 -j ACCEPT
sudo iptables -A INPUT -p tcp -m tcp --dport 993 -j ACCEPT

Allow SSH

sudo iptables -A INPUT -p tcp -m tcp --dport 22 -j ACCEPT

Caution: You could potentially loose ssh access to your server if you are not careful with this. If you have changed the SSH port number and are not using the default port 22 to login then replace 22 with the appropriate port number.

Allow established outgoing connections to receive incoming replies.

sudo iptables -I INPUT -m state --state ESTABLISHED,RELATED -j ACCEPT

Now allow all outgoing connections and block all the incoming connections except the ones we have explicitly allowed in the above rules.

sudo iptables -P OUTPUT ACCEPT
sudo iptables -P INPUT DROP

Now save the firewall rules

sudo iptables-save | sudo tee /etc/sysconfig/iptables

or

sudo iptables-save > /etc/sysconfig/iptables

Enable

sudo systemctl enable iptables

Now restart iptables

sudo service iptables restart

or

sudo systemctl restart iptables

Useful command:
List iptables firewall rules

sudo iptables -S
sudo iptables -L -n
alert('dsf'); console.log("dsdsdsd");