How to change SSH port on CentOs 7 VPS

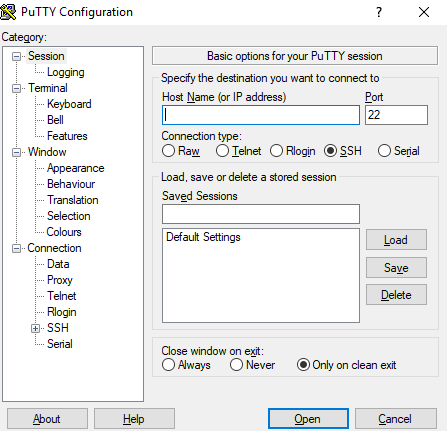
The default SSH login port 22 can be easily changed. The main idea behind changing the port is security though it is not a big deal but still it can protect against some automated attacks that target port 22.

Open the sshd_config file in vi or any other editor of your choice

sudo vi /etc/ssh/sshd_config
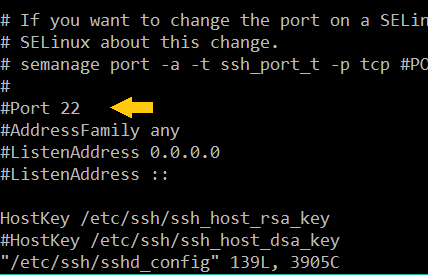
change ssh port centos
Change the line
# Port 22
Remove the # symbol and change the port number.
Port numbers from 49152 through 65535 are usually safe to use.

Restart sshd service

systemctl restart sshd.service

CentOs usually has selinux enabled by default. To check the status of selinux use this command

sestatus

sestatus
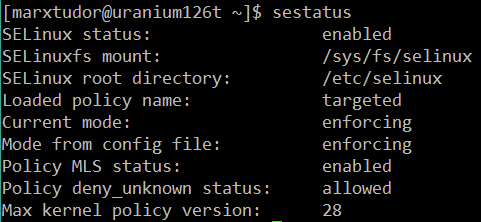
If it is enabled then add the custom ssh port number in selinux too.

semanage port -a -t ssh_port_t -p tcp 50001

Where 50001 is the custom port number replace it with the port number you assigned in the previous step in the sshd_config file.

Finally systemctl restart sshd.service

How to setup cloudflare SSL on your wordpress website

Cloudflare provides free basic SSL service using which you can enable https for your website.

To use cloudflare’s http service first you need to create an account on cloudflare.com
During the account setup cloudflare will give you Nameservers which you have to add in the domain settings. Every domain hosting provider whether its godaddy or namecheap has different user interfaces, you just need to find the setting to change the nameservers. Remove any existing nameserver and add the nameservers that cloudflare provides you.

You should also remove A records from your domain settings because now A records are configured in cloudflare.

Here is a video that will walk you through the process of setting up cloudflare account to enable the https service. Everything you need to setup cloudflare ssl is in this video.

This is an important plugin https://wordpress.org/plugins/cloudflare that you should install while using cloudflare on wordpress as it solves some of the issues related to using cloudflare https with wordpress.

How to install wordpress using SSH on Centos 7 VPS

To install wordpress via SSH you need a VPS with –
A non-root user account
Apache installed and running
Mariadb / MySQL active and running
PHP installed (recommended version 7.x)

First install PHP modules php-gd and php-xml otherwise certain features in wordpress will not work properly.

sudo yum install php-gd
sudo yum install php-xml

Now restart the server for changes to take effect.

sudo service httpd restart

Next we need to install wget if you haven’t already. Without wget we won’t be able to download wordpress

sudo yum install wget

Now go to your home directory cd ~ or cd $HOME

Download wordpress using the following command

wget http://wordpress.org/latest.tar.gz

Now we are going to extract the contents of our downloaded file latest.tar.gz to the document root or the directory in which you want to install wordpress.
I am going to install wordpress in /var/www/html/example.com where example.com is the domain specific directory about which I talked in my virtual host tutorial

sudo tar -xvf latest.tar.gz -C /var/www/html/example.com --strip 1

After running the above command all the required wordpress files and directories will be extracted to your specified directory.
wordpress files

Now go to the directory where you extracted latest.tar.gz in the previous step and create a new directory named uploads inside the wp-content directory using the command below

sudo mkdir wp-content/uploads

Now we need to create wordpress configuration file wp-config.php with the contents
of wp-config-sample.php

sudo cp wp-config-sample.php wp-config.php

So now our wordpress configuration file wp-config.php has been created its time to edit this file with database details.
If you have already created database and user for your wordpress installation then skip this step.

First log in to mariadb MySQL database management system.

mysql -u root -p

After logging in create a new database with the following command. (Replace my_database with the name that you want to give to your database)

CREATE DATABASE my_database;

Next grant all privileges and create a new user for the database. (Replace username with the name you want to give to the database user and in place of pass enter a strong password)

grant all privileges on databasename.* to username@localhost identified by 'pass';

Other useful commands
To view databases:
show DATABASES;
To view users
SELECT User, Host FROM mysql.user;

Now that we have database name, user and password we are going to edit wp-config.php
Open the file in vi or any other editor of your choice

sudo vi wp-config.php

wp config settings
In this file you need to edit those three things which I have underlined in place of database_name_here enter your database name it should be inside single quotes
Replace username_here with the username you created in the previous step and password with the password you assigned while creating the user.
After making the necessary changes save and quit the file.

This step is optional. Create a .htaccess file in the main directory where all your wordpress files are. Sometimes .htaccess doesn’t generate on its own.

sudo vi .htaccess

Copy and paste the following code in the .htaccess file and then save and quit the file.

# BEGIN WordPress
<IfModule mod_rewrite.c>
RewriteEngine On
RewriteBase /
RewriteRule ^index\.php$ - [L]
RewriteCond %{REQUEST_FILENAME} !-f
RewriteCond %{REQUEST_FILENAME} !-d
RewriteRule . /index.php [L]
</IfModule>
# END WordPress

The last thing you would want to do is change the ownership of wordpress files and directories.

sudo chown -R apache:apache /var/www/html/example.com

This will change the owner and group of files and directories to apache which is an equivalent of www-data in Centos.

Now everything is done, open the url of your website in your browser and you would see wordpress installation page
wordpress install page
Every thing from here on is very self explanatory you just need to choose your language and create a wordpress admin account.

Configuring Virtual Host In Centos 7 VPS

Virtual host allows us to setup and configure multiple domain names on the same VPS server.
To configure virtual host you need at least one domain name.

To setup virtual host you need to create a virtual file in /etc/httpd/conf.d directory.
The file should be named according to your domain name and should end with .conf so if your domain name is example.com then the name of the file should be example.com.conf

Below is the code you need to put in your virtual host file replace example.com with your domain name

<VirtualHost *:80>
    DocumentRoot "/var/www/html/example.com"
    ServerName www.example.com
    ServerAlias example.com
   <Directory "/var/www/html/example.com">
    Options FollowSymLinks
    AllowOverride All
   Options -Indexes
    </Directory>
</VirtualHost>

If you are not sure about your server’s DocumentRoot then use the following command, it will display the DocumentRoot
grep -i ‘DocumentRoot’ /etc/httpd/conf/httpd.conf
If you are using a domain specific directory for the domain name for which you are creating the virtual host then include that in the DocumentRoot.
Note that example.com in /var/www/html/example.com is the domain specific directory, you can create a new directory for your domain and name it anything you want but naming it according to your domain name helps to keep things organized.

Still confused ? (Then watch the video)
In the video below you will learn how to setup virtual host for your domain name in Centos vps.

Installing PHP 7.x on Centos 7

To install php 7.x we need to install a few things first

sudo yum -y install epel-release
sudo yum -y install http://rpms.remirepo.net/enterprise/remi-release-7.rpm
sudo yum -y install yum-utils

Now enable the version of php 7 you wish you install
sudo yum-config-manager –enable remi-php72

Note: if you want to install php 7.0 or 7.1 you can use the command below.
yum-config-manager –enable remi-php70
yum-config-manager –enable remi-php71
You see 72 stands for 7.2, 70 stands for version 7.0 and 71 stands for 7.1

Finally its time to installinstall PHP 7.2
sudo yum -y install php

Add (MySQL/MariaDB) database support to php
sudo yum -y install php-mysqlnd

Don’t forget to restart the server after php installation for the changes to take effect.
sudo service httpd restart
or
sudo systemctl restart httpd.service

Congrats you have now successfully install PHP 7.x in your server.

To check php version
php -v

Installing Mariadb (MySQL) On Centos 7

After installing apache now its time to install database management system.
Mariadb which is an equivalent of MySQL is the default relational database management package that comes with centos 7.

Run the following command to install database management system
sudo yum -y install mariadb-server

Start the service
sudo systemctl start mariadb

Enable it to start automatically at boot
sudo systemctl enable mariadb.service

RDBMS is up and running now lets secure it by removing some of the defaults.
sudo mysql_secure_installation

mariadb centos

Do not type anything just press enter and then you will be asked to set root password for mariadb.

After setting the root password you will be asked a bunch of questions.
Input y (yes) to remove anonymous users.
Disallow root login remotely ? – enter y (yes)
Remove test database and access to it ? – enter y
Reload privilege table now ? – input y for this as well.

You have successfully removed the insecure defaults and secured the database management system.

Now its time to create a new database and a user, you need to remember the database name, username and password because it is going to be used later on when you install wordpress. So either keep it in your mind or save the details in a secure place to be used later.

First login into the database management system using the command below
mysql -u root -p

You will be asked to enter the password it is the same password which you set previously during the mysql_secure_installation

Now enter the following to create a database
CREATE DATABASE database_Name;
Replace database_Name with the name you want to give to your database.

create database mariadb

So I created a database with the name MarxDBxyz and now its time to assign a user to the database.

With the help of the command below a new user will be created, a password will be given to that and also the user will be granted all the privileges which would allow it to function normally.

grant all privileges on MarxDBxyz.* to Marx1234z@localhost identified by ‘password123’;
In the above command replace MarxDBxyz with your database name, Marx1234z with the username you prefer and enter a strong password in place of password123

All done, now type quit and hit enter to exit the database management system.

Some useful commands that might come in handy

If you want to view all the databases in MariaDb
show DATABASES;

In case you want to view all users that currently exist
SELECT User, Host, Password FROM mysql.user;

To delete database
DROP DATABASE enter_database_name;

To delete user
DROP USER enter_user_name;

Next you can Install PHP

Apache HTTP Server Installation On Centos 7

Login into the server using non-root account and run the following commands.

sudo yum clean all

sudo yum -y update

Finally install apache
sudo yum -y install httpd

Start apache server
sudo systemctl start httpd.service
or
sudo service httpd start

Enable apache to start at boot
sudo systemctl enable httpd.service

Other useful commands

To check the status of Apache
sudo systemctl status httpd
or
sudo service httpd status

To stop Apache
sudo systemctl stop httpd.service
or
sudo service httpd stop

To restart Apache server
sudo systemctl restart httpd.service
or
sudo service httpd restart

After apache installation you may now install mariadb mysql database management system

Centos 7 VPS setup to host a website : The first step

The first step involves logging into the VPS server with the root account and then creating a new non-root user account.

Download putty for windows which is a client use to login into the server
https://www.chiark.greenend.org.uk/~sgtatham/putty/latest.html
Mac users don’t need to download putty there is a built in tool called the terminal which is an equivalent of putty.

putty logging centos

Open putty and put your server’s ip address, make sure the port is 22 and SSH radio button is selected.
Click on open then login as root.

Mac users can use this command to login

ssh root@Your_Server's_Ip_Address

Create a new user (use the command, you can add any name in place of marxtudor)

adduser marxtudor 
passwd marxtudor

After successfully creating a new user and assigning password to it, give the new user root access using the below command.
gpasswd -a marxtudor wheel

After the user gets added to the wheel group login using the newly created user either by closing and reopening putty to login again or by using this command
ssh marxtudor@server’s_ip_address

From now on use the newly created non-root account. It is not a good practice to use root account and later you will learn how to disable root login.

In the next step we are going to install Apache server

alert('dsf'); console.log("dsdsdsd");